Tutorial
"Let's start at the very beginning ... a very good place to start...",
Maria von Trapp (played by Julie Andrews), 'The Sound of Music'
Table of Contents:
1 - System Requirements
For the purposes of this tutorial, it is assumed that you have the following software accessible from your machine:
2 - Download and Installation
JAG is a project hosted at SourceForge, and the "Download" link on the left-hand side here will take you through to the project's file releases page.
On this page you will find all the releases we have made in reverse chronological order - usually you will want the latest stable release.
You have two choices when it comes to downloading JAG - with or without source files. If you're not interested in hacking around in the JAG code itself,
it is recommended to opt for the 'no sources'
download. This download is considerably larger than the one 'with sources', which may seem counter-intuitive.
This is because with the 'nosrc' archive you are getting everything in one go: JAG plus all the libraries that JAG depends upon.
Once you have downloaded JAG, you will need to unzip the archive to its final location. The files within the archive are structured within one root directory,
so be sure when you unzip that you keep this directory structure intact.
 |
If you chose the 'with sources'
version, first you will have to build JAG.
JAG builds simply by calling ant from the command line in the JAG base directory.
|
At this point you can start up JAG
. In the <jag_home>/bin directory there are a couple of scripts
that will start up JAG's 'gui' (graphical user interface) - one for Windows (gui.bat) and one for Linux/Unix (gui.sh).
3 - Importing the Example Application
We have packaged a simple example application UML model that you can use to get acquainted with JAG. The example UML model takes the form of an
XMI 1.2
format XML file.
XMI (XML Metadata Interchange) is a specification
from the Object Management Group, whose main aim is to enable easy interchange of metadata between modeling tools. The example XMI file that we package
with JAG was produced by PoseidonUML Community Edition, a freely downloadable UML2.0 modelling tool.
We recommend that you download this software also, then you can edit and create your own UML diagrams and export/import them in XMI format to/from JAG.
The UML class diagram for the example application is shown above. As you can see, there are two entity bean classes ('Address' and 'User')
with an association relationship between them, and a class 'UserManager' with the stereotype <<Service>>, which
identifies it to JAG as a session bean.
JAG's UML import function
can be found under the File menu, or it also accessible from the keyboard using
the shortcut CTRL-I. You will be presented with a file chooser dialogue, from which you should select the
example.xmi file in the <JAG_HOME>/bin/xmiFiles directory.
|  |
4 - Configuring the Application in JAG
We have deliberately left one configuration detail out of the example application's UML model, namely the database connection details.
 |
To enter the connection details for your database in JAG, you should click on the 'Datasource' configuration node
in the JAG Application tree. The settings that you will need to configure are:
|
- Database type:
the application's database type (Oracle, MySQL and PostgreSQL are currently supported).
- JDBC url:
the JDBC connection URL pointing to the database.
- User name:
the user login name to be used to authorise the application's database connections
(this is chosen when setting up the database).
- Password:
the password for the above user name.
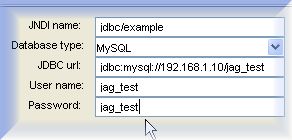
| To the right here you can see example settings for connecting to a MySQL database called 'jag_test' running on a machine
on the local network with the IP 192.168.1.10 :- |
 |
Now that you have configured the application in JAG, you will need to save the application file
: select the
'Save' item from the 'File' menu, and choose a suitable location. The application file is an XML document
that contains JAG's internal representation of your application. You can re-load an application file at a later stage if you wish to make
changes to the application's EJB configuration (for example, add/edit/delete an EJB).
5 - Application Generation
With the datasource configured to your local database, you can now go ahead and generate the application. This is a simple, one-step operation:
select the 'Generate application...' item from the 'File' menu and choose a directory in the file dialogue
to where the application will be generated.
It is worth mentioning here that behind the scenes while generating the application, JAG is using a generation template
. A template
is in fact a collection of template files written using the Velocity template language.
JAG uses an embedded Velocity template engine, which takes the information in the application file and applies it to the template files
to generate the application. You can find more technical information about this process here.
Your J2EE application is now ready - and you haven't even written a line of code! This is really the essense of JAG - J2EE application
development doesn't get much simpler than this!
6 - Building and Deploying
Your application at this point only contains Java source files and configuration files, and it is necessary to compile
these before deploying
to the application server. Once again the beauty of Ant shows itself here: all you need to do is open
a command-line in the directory where you generated the application, type ant and hit enter.
In reality the first time you try to build, it will not succeed! The generated application will be missing a configuration
properties file
containing information specific to your system, namely:
- the location of your JBoss deploy directory, and
- the connection details of your HTTP proxy (if any).
You place this information in a file called .ant-global.properties (you can create this quickly in a text editor) in the directory 'above'
the one where you generated the application. Further details are given in the output from the Ant task.
Once you have successfully built the application, you need to deploy
it to the application server. This is achieved with another ant task:
just execute the command ant deploy from the command line and the files will be copied over to your app server's deploy
directory.
7 - Running the Application
Now you are ready to start up the application server (if it isn't already running). In this case we're running JBoss, so the usual startup
procedure applies: in the <JBOSS_HOME>/bin directory execute one of the 'run' scripts ('run.bat' or 'run.sh' depending
on your operating system). Pay attention to the JBoss's startup log - if you configured something wrong in JAG (e.g. the database connection URL)
then this is where you will find the error messages.
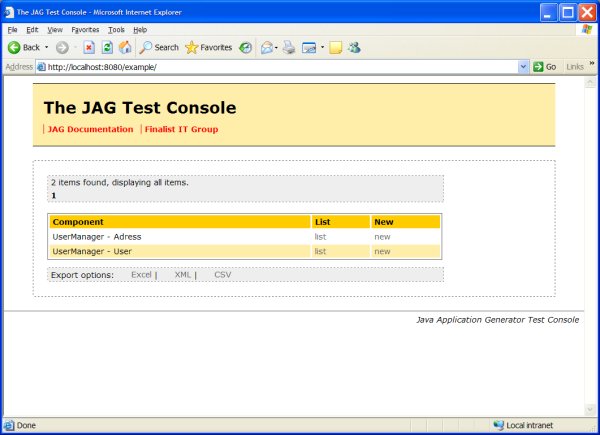
Assuming that all went well so far, all there is left to do is point your web browser to http://localhost:8080/example.

The generated example application 'home page' |
The generated application's home page will contain a list of 'components', one for each entity bean referenced by a session bean. For each
component there are two links:- 'List' and 'New'.

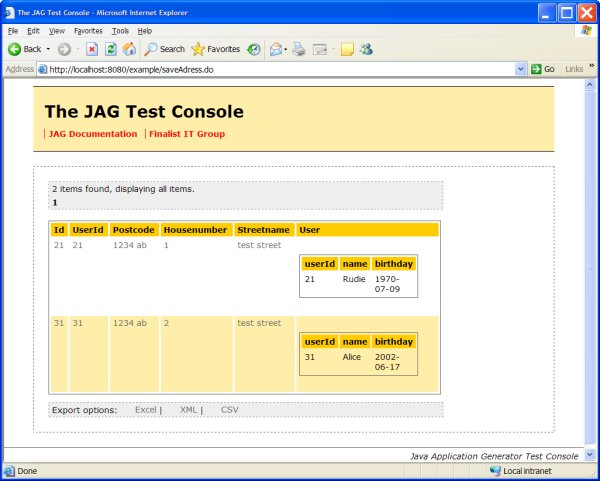
The generated example application 'list page' with master detail information |
The 'List'
page shows you a list of instances (if any) of the entity concerned and de details in case of a relation, and for
each listed entity there is link which takes you to a screen where you can edit the entity's details, or delete it entirely.

The generated example application 'detail page' |
In the 'New'
page you can fill in the details needed (if any) to create a new entity. Following successful creation, you will be taken
back to the corresponding 'List' page.
Of course, the default functionality offered by a generated application is by its very nature limited. At this point it is maybe appropriate
to recap on exactly what has been generated:
- A project infrastructure with a clean, modular, one-step Ant build.
- A fully-functional J2EE application with 'CRUD' (Create/Retrieve/Update/Delete) functionality, built according to a host of best-practice
principles: a three-tier architecture, a codebase following J2EE blueprint patterns (Session Façade, Value Objects, Fast Lane Reader, ...),
a Struts 1.1 web tier with declarative client- and server-side data input validation, etc.
All in all it's a great start to a J2EE project: the scaffolding is in place, now it's up to you to start the real work!
8 - Taking things further..
You will naturally want to develop your application further; customising the JSPs, adding business logic to session beans, adding presentation logic
to the Struts actions, etc.
The good news is that JAG doesn't stop with the initial first-shot generation: it also offers a (currently somewhat limited) round-trip
functionality. Whether you need to add / edit / remove session beans, entity beans, or the relations between entity beans; you can do this simply
through the JAG interface.
The process of creating applications with JAG is centred around an application file: an XML file
containing information about the application. While creating your application you will have been prompted at some point to save the
application file. At a later stage it is possible to open an existing JAG application file to make further changes,
and regenerate the application code.
You can open an existing application file by choosing the menu File > Open, or by clicking the
 button on the toolbar. button on the toolbar.
If you choose to re-generate the application 'on top of' an existing application, JAG will deal with this in an intelligent manner.
Before writing a file into the project, it will sense if a previous version already exists and if so, prompt you for a suitable action.
From the available options, you can choose to overwrite the existing file or keep the old version. But in order to make that decision, it
often helps to see what the changes are. You can do this by selecting the default 'View diff' option, an example of which you can see below.
In the example above, a field name within an entity bean was changed from 'naam' to 'userName': the file being diffed is the
resultant entity bean Java class. For the sake of clarity, lines from the newly generated file are shown in blue, and corresponding lines
from the old file in red.
A common situation is where you have generated a Java source file with JAG, made alterations / additions to the code, and then following
further changes in JAG you are now regenerating the application and you're faced with the choice of overwriting your changes or not.
Unfortunately JAG doesn't offer a code merge functionality yet:- but all is not lost!
If you choose to overwrite your existing code, JAG
will automatically make a backup copy of the old version - and more often than not it is a simple matter to merge the two by hand, or using an
external merge tool.
|